

In-Office Teeth Whitening: Professional Advantages, Costs and Options
Medically Reviewed by: John H. Krell, DDS
Are you considering teeth whitening to help reinvigorate a smile tainted by discoloration? Professional, in-office teeth whitening is the most popular cosmetic dental procedure in the world today. Unlike home-use systems that incorporate low-dose bleaching agents, in-office whitening takes place under carefully monitored conditions which allow for the safe, controlled, pain-free use of a relatively high concentration of bleaching gel – yielding results that are visible immediately.
Advantages
- Produces fastest results.
- This is the safest form of bleaching.
- Gum and tooth sensitivity (formerly drawbacks to in-office bleaching) are more controllable today due to thicker peroxide gels (that don’t soak into the teeth as much as previous gels) and the use of desensitizers such as potassium nitrate and fluoride.
Disadvantages
- More expensive than take-home alternatives. Its cost, on average, is $650, compared to $400 for take-home trays and under $100 for over-the-counter bleaching trays or strips.
- Results can be unpredictable, depending on factors such as age, heredity and the type of staining that is present.
- In-office bleaching is not a permanent solution. Shortly after treatment is completed, the teeth resume accumulating stains. Many dentists therefore recommend home maintenance follow-up with a lower-percentage bleach that can be kept on the teeth for longer periods of time.
Stains That are Best Removed by a Pro
Chairside whitening removes organic stains or discolorations primarily caused by:
- Aging. Over time, the teeth darken with a yellow, brown, green or grey cast (which may be due to heredity and/or eating habits). Yellowed teeth tend to whiten most readily.
- Consumption of certain foods (notably coffee, red wine, sodas and dark-colored vegetables and fruits).
- Tobacco use.
Stains Resistant to In-Office Whitening
- Teeth with certain stains – typically those that are inorganic – do not respond well to in-office treatment. In fact, these teeth may look even darker after the surrounding teeth have been whitened.
- Trauma, which causes the dentin to darken.
- Tetracycline antibiotics ingested during tooth-formation. These drugs chemically bind with the crystalline structure of both the tooth’s enamel and underlying dentin.
- Overexposure to fluoride, which can cause fluorosis, resulting in tooth discoloration.
Teeth Whitening vs Dental Veneers
Whitening and veneers are two popular smile makeover treatment options. Weigh their pros and cons with your needs.
Are you a Candidate?
This procedure is not suitable for those with the following conditions:
- Tooth and gum hypersensitivity. To avoid a hypersensitive reaction, your dentist is likely to recommend take-home bleaching trays with a low concentration of carbamide peroxide – which is not as potent as hydrogen peroxide.
- Deep and intractable staining. Some stains are resistant to high-concentration in-office bleaches. In such cases, dentists may recommend a supervised regimen of intensive take-home bleaching or alternatives to peroxide bleaching such as bonding, crowns or veneers.
- Teeth that have become transparent with age. This is particularly true of the front teeth, which are thin to begin with.
Prepping the Teeth
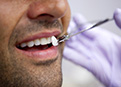
- Your teeth will likely be given a prophylactic cleaning to clear away plaque and debris that have collected on the surface and between the teeth.
- A dental exam will be performed (often in tandem with the prophylactic cleaning) to check for potential problems such as severe tooth decay, cracks and gum disease. Bleaches can cause varying degrees of irritation if these conditions are present. Your dentist will likely delay the procedure until such problems have been corrected.
- Photos may be taken of your teeth, and their color measured on a shade guide. This provides a benchmark for assessing your progress.
The In-Office Whitening Procedure
While details may vary, a fairly standard routine is followed. Typically, the steps involved are not painful or uncomfortable; in fact, many patients doze or watch a DVD or TV during the procedure.
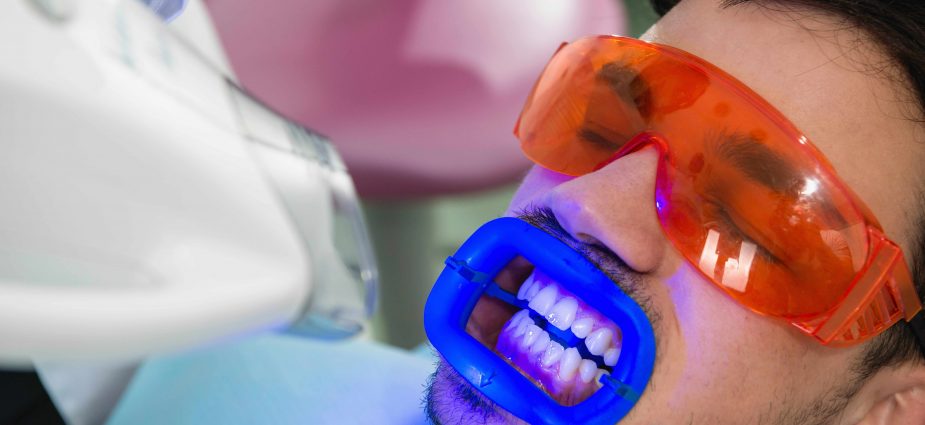
- A cheek retractor is inserted into the mouth, exposing all the “esthetic zone” teeth (teeth that are visible when you smile).
- A liquid rubber dam or hardening resin is painted onto the gum tissue to protect against any irritation caused by the bleaching gel.
- A bleaching gel containing hydrogen peroxide is applied to the esthetic zone teeth and kept on for approximately 15 to 30 minutes.
- The bleaching gel is suctioned or washed off, and fresh gel is applied for one or more additional periods of 15 to 30 minutes.
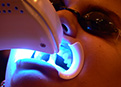
- Some whitening treatments incorporate an intense light that is focused on the teeth and is said to activate or enhance the bleaching process. Opinions vary as to whether this light improves the bleaching outcome.
- Between gel applications, the teeth are checked to see how well they have whitened, and whether more bleach needs to be applied.
- After the final gel application, the cheek retractors are removed, the patient rinses and the immediate post-treatment shade change is measured. The teeth may whiten by as few as two to three shades or as many as eight (out of a total of 16). Part of the whitening effect is due to dehydration during the bleaching process, which makes the teeth look whiter than their true new color. That color will emerge after a couple of days.
If a satisfactory level of whitening hasn’t been achieved, your dentist may recommend follow-up in-office bleaching at a future date, and/or a regimen of take-home bleaching trays.
What are Your Options?
A number of brand-name whitening systems are in use at dental offices today. Here are a few such systems available in dental offices:
BriteSmile
Known for its gentleness and ease of access, the BriteSmile bleaching system is available at participating dental practices and self-standing BriteSmile whitening locations throughout the country.
The BriteSmile whitening procedure features proprietary hydrogen peroxide gels (concentrations of 15 percent and 25 percent), which are pH balanced to maximize efficacy, and which contain glycerin and water to help minimize tooth dehydration. Dental practices offer both gels, while BriteSmile facilities feature only the 15 percent gel. Generally, the gels are applied to the teeth for three 20-minute intervals.
During each application, the teeth are illuminated with a blue lighting system that is shaped to reach all esthetic zone teeth at the same time.
Total chair time: Approximately one hour.
Cost: At dental offices, prices vary around the country. At BriteSmile centers, $600; $399, if payment is made in advance.
(Read more about Britesmile whitening)
Opalescence Boost
Praised for the viscosity of its bleaching gel – a sticky quality that is considered a major plus in tooth-bleaching – Opalescence Boost relies on chemistry for achieving its effects, and does not include the use of a special light activator. Its 38 percent solution of hydrogen peroxide gel contains a unique patented component called PF, a mix of potassium nitrate (reducing the risk of sensitivity) and fluoride (the enamel-strengthener which reduces the risk of cavities).
Total chair time: One to two hours.
Cost: $500.
(Read more about Opalescence whitening)
Zoom! Chairside
Widely used throughout the country and the world, the Zoom! system features a 25 percent hydrogen peroxide gel and the Zoom! Advanced Power Chairside Lamp, said to accelerate the bleaching process. Generally, the hydrogen peroxide gel is applied three times, each interval lasting 15 minutes. Immediately afterwards, a sensitivity-reducing fluoride paste-gel is applied to the teeth.
To help maintain your whitened teeth, you are given a Zoom! home-use touch-up kit, including custom-fitted whitening trays.
Total chair time: Approximately one hour.
Cost (including take-home trays): $500.
(Read more about Zoom whitening)
Deep Bleaching
Deep Bleaching is not a teeth whitening brand, but rather a multi-phase protocol involving a reversal of the usual chairside bleaching, followed by home bleaching. This technique has a reputation for whitening even the most intransigent stains (due to tetracycline or fluorosis, for example) and for maintaining optimally whitened teeth over the long haul.
Step 1
During an office visit, the dentist takes highly detailed impressions of the teeth and gumline. Based on those impressions, vinyl trays containing bleaching-gel reservoirs are custom-fabricated. Resembling the aligners used in contemporary orthodontics, these trays provide a unique fit that compresses right up to the gumline. The intention is to keep the bleaching gel sealed inside, thus preventing gum irritation and the mixing of saliva with the gel.
Total chair time: 30 minutes.
Step 2
You return to the dentist’s office for a “conditioning visit.” The aim here is not to whiten the teeth, but rather to make them more permeable to oxygen.
- First, the outer surfaces of the teeth are polished with pumice powder.
- Next, two coatings of a desensitizing-conditioning agent are rubbed onto the teeth.
- Your custom-made bleaching trays are loaded with a nine percent hydrogen peroxide gel and pressed onto the teeth. Since the trays are designed in part to protect the gums, the use of retractors and rubber dams is optional – though recommended for patients with extremely sensitive gums. The trays remain in place for 20 minutes.
- The gel is suctioned out of the trays and off the teeth.
- The trays are reloaded, reinserted for 20 minutes and then removed.
- Two coatings of desensitizer are again rubbed onto the teeth.
Total chair time: Approximately one hour.
Step 3
You are sent home with a kit containing your trays, sufficient carbamide peroxide gel to be used overnight for 14 consecutive nights (when saliva flow is at a minimum and least likely to interfere with the peroxide’s bleaching action) and a tooth desensitizer contained in a squeeze bottle. The goal is both to whiten the teeth and to make them more permeable to oxygen.
Step 4
Now with your teeth more receptive to the oxygenating effect of bleach, you return to the dentist’s office – this time for a standard power bleaching session with retractors and rubber dam. Depending on how deeply the teeth have been bleached using the home trays, your dentist will use a nine percent or a 27 percent hydrogen peroxide solution.
Following chairside bleaching, your teeth will have been bleached to maximum whiteness.
Total chair time: Approximately one hour.
Step 5
To maintain maximum whiteness, you continue using your Deep Bleaching Trays overnight once every one to three months. If you drink red wine on a daily basis, you are advised to use the trays overnight once every two weeks.
Dentists who use the Deep Bleaching regimen say it provides permanent deep-whitening if patients follow maintenance instructions.
Cost: The fee for the two in-office procedures, custom-fabricated trays and 14 days of home bleaching, ranges from $800 to $3,500. On average, the fee is $1,250. The price of maintenance bleaching gel is $5 to $7 for each overnight treatment.
[updated March 27, 2019]
About the Reviewer

John H. Krell, DDS is a top Houston family dentist committed to dental aesthetics, high-quality patient care and compassion. Harnessing state-of-the-art, forward-thinking technologies and a conservative approach to dental care, Dr. Krell strives to provide his patients with the best available treatments focused on prevention in a calming and welcoming practice environment. Hailing from a family of dentists, Dr. Krell works alongside his brother to cater to the dental care needs of patients in and around Houston. Learn More

Britesmile Teeth Whitening
Your guide to Britesmile teeth whitening, with information about the procedure, its effects, considerations and cost.
Read More >>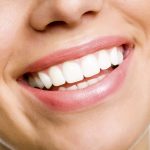
Lumibrite Whitening: Illuminate Your Smile
Compare Lumibrite whitening with other in-office and take-home teeth whitening products, and evaluate the typical cost.
Read More >>
Opalescence Whitening: Give Your Smile a Boost
A comprehensive guide to Opalescence teeth whitening, including information about the various products and their cost.
Read More >>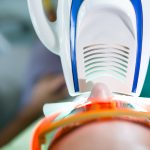
Zoom Whitening: Is it Right For You?
A comprehensive guide to Zoom! in-office teeth whitening, including information about the procedure, its costs and your alternative whitening options.
Read More >>